11 KiB
DeepDive into Liquid: Part II - Asset Creation and Configuration
This is a multipart DeepDive that will focus on the Liquid Sidechain. It will be released in 3 Parts:
- Part I: Overview, Installation, and first Peg-In
- Part II (this): Asset Creation and Configuration
- Part III: Advanced Topics and Peg-out
Assets
In Part I, we succesfully Pegged-In our BTC and received L-BTC, now lets use that L-BTC to do some interesting things with Asset Issuance:
Before we jump straight into creating an asset, let us first look at the assets we already have inside our pegged-in wallet1:
-
$ sudo ./scripts/app compose elements exec node elements-cli -rpcuser=$E_RPCUSER -rpcpassword=$E_RPCPASS getwalletinfo"balance": {"bitcoin": 0.00149155}
-
$ sudo ./scripts/app compose elements exec node elements-cli -rpcuser=$E_RPCUSER -rpcpassword=$E_RPCPASS dumpassetlabels{"bitcoin": "6f0279e9ed041c3d710a9f57d0c02928416460c4b722ae3457a11eec381c526d"}
So our wallet already has an asset called 'bitcoin' and there is an associated UUID of 6f0279e9ed041c3d710a9f57d0c02928416460c4b722ae3457a11eec381c526d. Everything in Liquid is an 'Asset' (including L-BTC) and each of these Assets can have different features.
Looking up this value on https://blockstream.info/liquid/assets we can see some info about it:
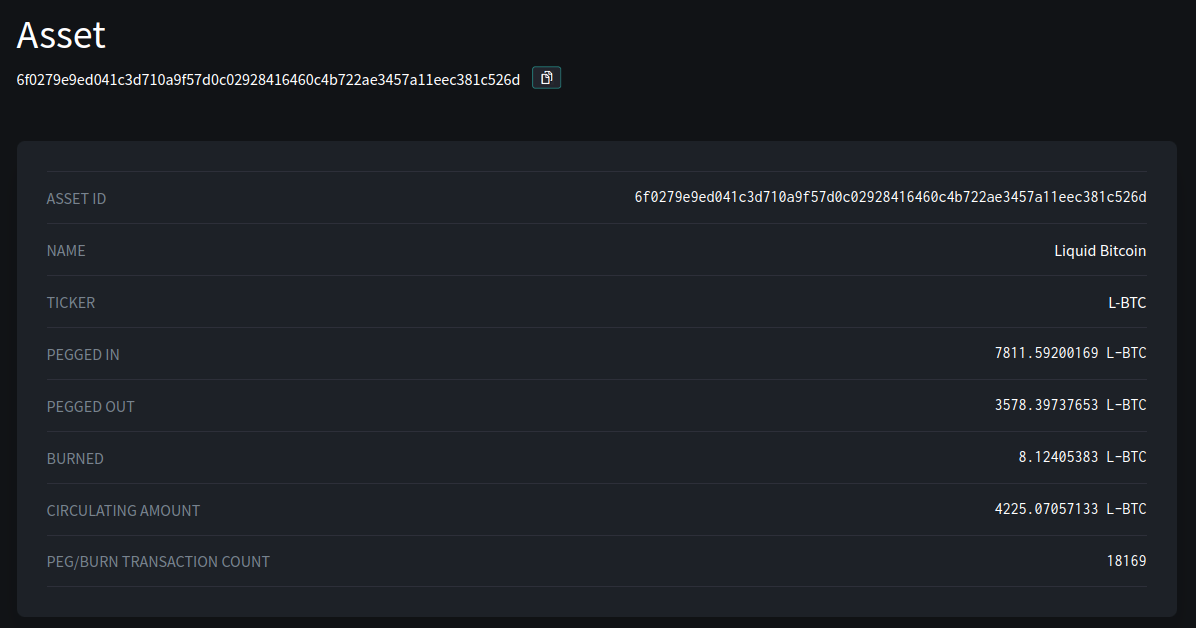
This shows us the total amount of L-BTC in circulation, additionally we can see how much was Pegged-In, Out, and Burned. Most notably, this confirms that everything is in balance. The Circulating Supply = (PEG_IN - PEG_OUT - BURNED), so no debasement has happened.
Issuing our own Asset
Issuing assets is pretty straight forward, it can be roughly broken down into 3 main steps2:
- Generate a Legacy Address3 and PUBKEY for that address
- Generate a Contract Hash using that PUBKEY
- Issue the Asset
-
STEP 1: Let's generate our legacy address and set the output to a variable and get its public key
$ sudo ./scripts/app compose elements exec node elements-cli -rpcuser=$E_RPCUSER -rpcpassword=$E_RPCPASS getnewaddress "" legacylq1qq2s92z0uq78kd4gfepua6qvfwx40g4lqqer9e3tzrr0j04ugyzsed39mnh9wvuhw0hmaqy5mxs9egqrr7j3rx8j2sdyun9m90
$ export LEG_ADDRESS="lq1qq2s92....."$ sudo ./scripts/app compose elements exec node elements-cli -rpcuser=$E_RPCUSER -rpcpassword=$E_RPCPASS getaddressinfo $LEG_ADDRESS | jq '.pubkey'
025aa49d444a150c99c904c8e779e5317aff4aee15ee9171f450e14af9dd8b8780
$ export PUBKEY="025aa49d444a150c99c904c8e779e5317aff4aee15ee9171f450e14af9dd8b8780"
-
STEP 2: In order to generate the contract hash, it requires a few steps - so I've simplified it by making a bash script. Copy this into a file named
gen_asset_contract.shand mark as executable
#!/bin/bash
#set -x

shopt -s expand_aliases

### FILENAME: gen_asset_contract.sh
### USAGE: ./gen_asset_contract.sh PUBKEY

if [ -z "$1" ]
  then
    echo "Please supply PUBKEY before running"
    exit 1
fi

PUBKEY=$1

###EDIT THESE VALUES###

DOMAIN="nulldata.org"
NAME="StackerNews-Demo1"
PRECISION=8
TICKER="SND-1"

### END EDITING HERE ###
CONTRACT='{"entity":{"domain":"'$DOMAIN'"},"issuer_pubkey":"'$PUBKEY'","name":"'$NAME'","precision":'$PRECISION',"ticker":"'$TICKER'","version":'0'}'

CONTRACT_HASH=$(python -c 'import json,sys; sys.stdout.write(json.dumps(json.loads(sys.argv[1]), sort_keys=True, separators=(",",":")))' "$CONTRACT" | sha256sum | head -c64 | fold -w2 | tac | tr -d "\\n")

echo CONTRACT=$CONTRACT
echo CONTRACT_HASH=$CONTRACT_HASH
-
Now we can use the script we saved before to generate the contract:
$ ./gen_asset_contract.sh $PUBKEY
CONTRACT={"entity":{"domain":"nulldata.org"},"issuer_pubkey":"025aa49d444a150c99c904c8e779e5317aff4aee15ee9171f450e14af9dd8b8780","name":"StackerNews-Demo1","precision":8,"ticker":"SND-1","version":0}
CONTRACT_HASH=967f329b873d20253852236bcb4aab8df355356c06a4f0190361dfe6e58a838b
-
Finally export those variables via bash to use later:
export CONTRACT={"entity":{"domain":"nulldata.org"},"issuer_pubkey":"025aa49d444a150c99c904c8e779e5317aff4aee15ee9171f450e14af9dd8b8780","name":"StackerNews-Demo1","precision":8,"ticker":"SND-1","version":0}

export CONTRACT_HASH=967f329b873d20253852236bcb4aab8df355356c06a4f0190361dfe6e58a838b
####REDO HERE####
- STEP 3: Now Issuing our own asset is straight-forward, as its a single line command in the client. Let's issue 10 new tokens and set the supply to be fixed (no re-issuance)
$ sudo ./scripts/app compose elements exec node elements-cli -rpcuser=$E_RPCUSER -rpcpassword=$E_RPCPASS issueasset 10 0 true $CONTRACT_HASH
{ "txid": "6ef6b04b34e27d79c0b66d817bc23a81bc6a56b289b6a45a28b71489adca0825", "vin": 0, "entropy": "570671c45afd4b9bfd085e5e965333e32f3988d3b68d4baf276ff3f833f8f531", "asset": "b142fb9ec2c7821f025f3ae806cfbec6e9faccbf876a531e8a207b45bc6a285a", "token": "f13a9858f5acec84f8195d95c764c839812deeee297ca654ba1f25d650e1b8ea" }
Exploring our new Asset
-
Checking out our wallet we see:
-
$ sudo ./scripts/app compose elements exec node elements-cli -rpcuser=$E_RPCUSER -rpcpassword=$E_RPCPASS getwalletinfo"balance": {"b142fb9ec2c7821f025f3ae806cfbec6e9faccbf876a531e8a207b45bc6a285a": 10.00000000, "bitcoin": 0.00140447,}
-
-
We can see our wallet has 10 of our assets4, lets checkout what the Liquid network knows about it:
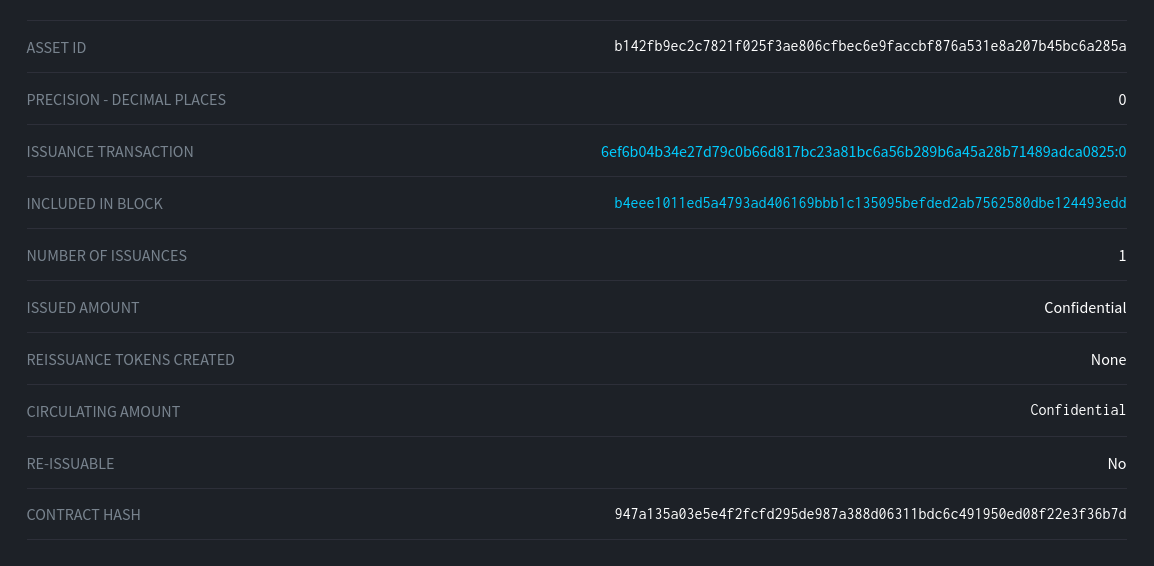
- So publiclly we know the following about our new asset:
- It cannot be re-issued
- It has only been issued once
- However both the issued amount and the circulating supply has been hidden from us.
This Confidential Asset has ultimate privacy, we can't really see anything about it. One of the problems with this, is how could users validate the total circulating supply? It is possible to 'unblind' this information to clients, but that would involve distributing an unblinding key to each client. However there is a simple solution here, we can simply issue the asset as unblinded - which will permit this information to be publicly available without affecting the security of the actual transactions:
Issuing a Non-Confidential Asset
-
Let's create another asset and this time choose a different option (specifically, lets create this asset unblinded):
$ sudo ./scripts/app compose elements exec node elements-cli -rpcuser=$E_RPCUSER -rpcpassword=$E_RPCPASS issueasset 10 0 false $CONTRACT_HASH
{ "txid": "f27c99793f685fa4109ecec68d79819b077946427a489c5301ccbde136d4e070", "vin": 0, "entropy": "7df9c90b4fea440c43f5a92f24089999d50ee7af828afb7a3dd577015689ee2b", "asset": "409b1d0cb614822ea703576b71958ab051d66ff6708b368f378f2ffea458d15a", "token": "81ab87384b9317c21085b580b129a6cd13a42ced5e7f5ae6ce2638c62c6986ca"}
...and checking again what the Liquid network knows about it
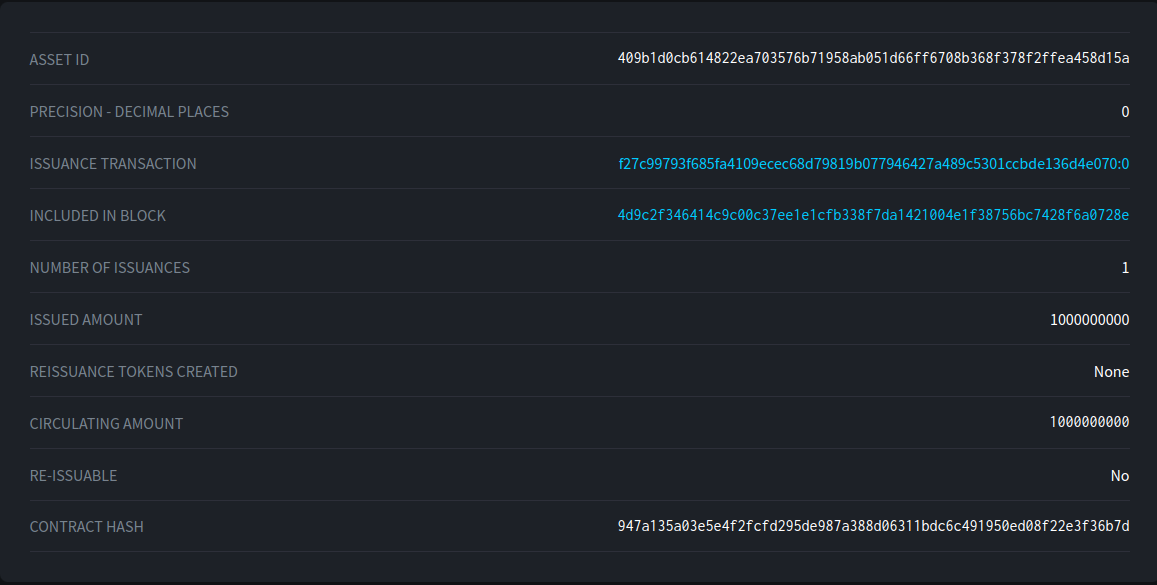
-
Now we can see the total issued amount / supply4
-
Let's try sending 2 of these unblinded assets to another wallet (my Blockstream Green mobile wallet) and see what is visible on the network.
$sudo ./scripts/app compose elements exec node elements-cli -named -rpcuser=$E_RPCUSER -rpcpassword=$E_RPCPASS sendtoaddress address="VJLJZQ...." amount=2.0 assetlabel="409b1d0...."
1122b7ef721864b0682120d474cc5a68e6c58fc62a2482bdc5195782f4503e7a
- Looking up this transaction on the block explorer, we see:
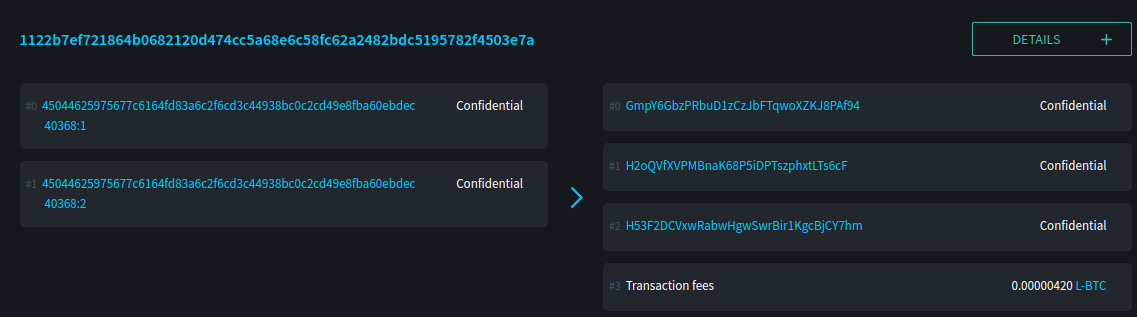
This is interesting: So although the transaction is visible, we can't see what was actually transferred (even though the details of the asset are visible, it is still hidden inside the transaction). Further, where is my Green Wallet address (ie. VJLJZQ...)? We can see 3 output addresses, presumably these are: Change, Fee, and Receipiant...but which is my Green Wallet?
- Let's look up my Green Wallet address directly in the explorer:
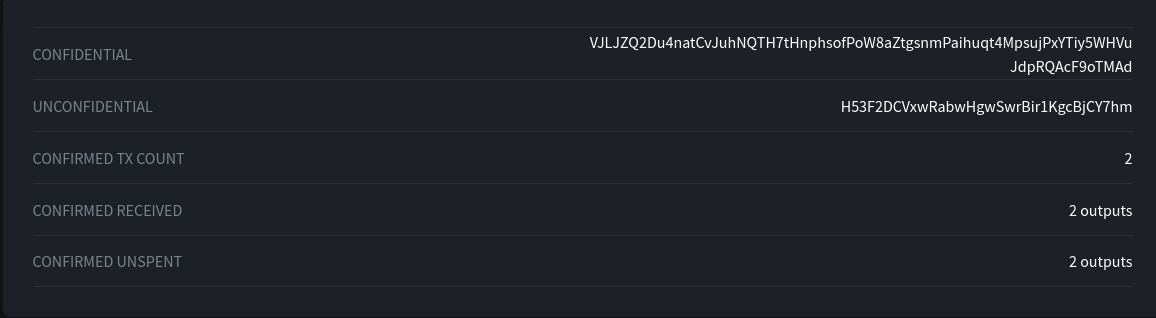
So now this shows us that the Confidential Address: VJLJZQ2... corresponds to the Unconfidential Address: H53F2D.... Through the magic of one-way hashes, if we know the "Confidential" address we can then dervive its public address....however just by looking at the public blockchain, there is no way to reverse that hash.
Now, lets look at how things look on the Green mobile wallet:
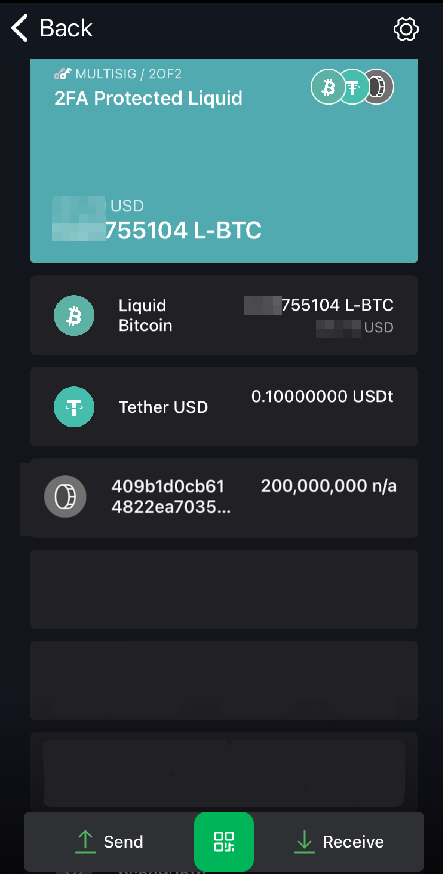
We can see that we've received 200,000,000 'sats' of our custom asset. However, notice how there is no label. Whereas, for L-BTC and Tether it shows complete with name and ticker symbol. Showing just the contract address is not very user friendly. Let's see if we can remedy.
Registering our Asset
The publication of asset metadata info on Liquid works on a .well-known system where specific files are published on a webserver that you control. There are a few different steps to accomplish this, so lets begin
-
Lets set a few environmental variables to make things easier:
$ ASSET_REGISTRY_URL="https://assets.blockstream.info/"$ export DOMAIN="nulldata.org"(NOTE: Needs to match what you set in Bash script above)$ export ASSET="409b1d0cb614822ea703576b71958ab051d66ff6708b368f378f2ffea458d15a"(NOTE: Needs to match the asset you are registering)$ echo "Authorize linking the domain name $DOMAIN to the Liquid asset $ASSET" > liquid-asset-proof-$ASSET
Running the above will result in a file named liquid-asset-proof-409b1d0c... being created, and inside that file it will say Authorize linking the domain name nulldata.org to the Liquid asset 409b1d0c...
First you need to place this liquid-asset-proof file in the root directory of your domain under a folder named .well-known
Before you proceed to the next step, please verify that they above file is reachable. Go to an external machine and issue:
$ curl https://nulldata.org/.well-known/liquid-asset-proof-409b1d0cb614822ea703576b71958ab051d66ff6708b368f378f2ffea458d15a
...and it should output the Authorize linking the domain text.
-
Now we can push the data to blockstreams server, lets create a script:
$ echo "curl $ASSET_REGISTRY_URL --data-raw '{\"asset_id\":\"$ASSET\",\"contract\":$CONTRACT}'" > register-asset.shVerify that this script looks sane, mark it as executable and run it.
-
The values E_RPCUSER and E_RPCPASS, where environmental variables we set in Part I ↩︎
-
Technically just running
elements-cli issueasset 10 0is enough to issue an asset, however there will be limitations later on when trying to register the asset, burn, remove, etc. ↩︎ -
Using a legacy address for this task imposes no real implications to your security since its only used to remove assets from the registry. Its possible to do this with a non-legacy address, but more steps are involved and we will need to use other tools rather than what's already built-in to Elements node, so we will just use a legacy address for this. ↩︎
-
Like in bitcoin, 1 integer unit is 100,000,000 base units (not sats, but equivalent concept) - So in this case issuing "10" assets is really issuing 1,000,000,000 units (10 x 100,000,000). ↩︎